Experiential Design

Ngu Kah Shin / 0347666
Experiential Design/ B' in Creative Media / Taylor's Design School
Exercise: Trending experience
Project 1: Experience Design Project Proposal
Project 2: Creative Experience Design Project Prototype
Final project: Completed Experience
INSTRUCTIONS
LECTURES AND EXERCISES
Week 1
Being the first Experiential class of this semester, Mr Razif briefed us on
the assignments and projects we will expect from this module. Mr Razif then
showed us
past seniors' work
to inspire us on our upcoming work, where we should explore the current,
popular trend in the market to better understand the technologies and the
knowledge in creating content for those technologies. He also prompted
some polls about AR and devices we students used. What I found interesting was
our class was split exactly in half for our mobile devices!

Fig 1.1 Screenshot of a poll shared by Mr Razif during class
Mr Razif requested to have Figma, Miro and Unity downloaded as we will be using these 3 platforms throughout t the semester. Because I have never used Unity before, I did some research on what Unity is for and how it is used.
The information below is excerpted from this article: The Ultimate Beginners Guide To Game Development In Unity
Unity is a great tool for prototyping everything from games to interactive visualizations. In this article, we run through all you need to know to get started using Unity.

Fig 1.2 Unity editor window
Scene View: Allows placement and movement of GameObjects in the Scene
Game View: Previews how the player will see the scene from the camera
Inspector: Provide details on the selected GameObject in the scene.
Assets / Project: All prefabs, textures, models, scripts etc are stored here
Hierarchy: Enables nesting and structuring of GameObjects within the scene
Week 2
We had a hybrid class today, some were on campus with Mr Razif and some,
like me, were in our respective homes. We learned about user mapping,
journey mapping, and all the necessary terminologies!
From
Thinkers Co, SD, CX, UX, UI, and IxD all adopt a user-centered approach. They bet on
the quality of the product and service as a fundamental piece of success.
Service Design (SD)
- the multidisciplinary activity of planning and organizing: the people, infrastructure, communication, and materials that make up a service
- improve overall customer satisfaction and the operational efficiency of the company
Customer Experience Design (CX)
- experience of a customer with a company or brand, at all points of contact
- works on how, when, and where to provide a service
- more than just building experience or building a brand
User Experience Design (UX)
- covers the traditional human-computer interaction (HCI) design and extends it by addressing all aspects of the end user’s interaction with the company, its services, and its products
- focusing on making the overall experience the best possible emotionally, socially, and culturally, psychologically, and physically
- seeks to enhance user satisfaction through the improvement of usability, accessibility, and pleasure provided by the interaction between the user and the product/service.
User Interface Design (UI)
- process of creating interfaces in software or equipment with a focus on appearance or style
- involves selecting the correct interface elements, such as text, buttons, text fields, color-coded lists, etc., for the task that the user is trying to perform and organizing them on the screen in a way that is easy to understand and use
Interaction Design (IxD)
- defines the structure and behavior of interactive systems
- the communication, action, relationship, or reciprocal influence between the user and the product to achieve an objective within a context
Fig 1.3
For Task 1, I was grouped with Nigel to create Journal Mapping. We decided
to create a journal map on watching movies in the cinema. I have attached
the feedback from Mr Razif in the notes on
our Miro Board

Fig 1.4
Week 2
Today, we learned about Extended Reality. XR is an umbrella
term that covers VR, AR, and MR. All XR tech takes the human-to-PC
screen interface and modifies it, either by 1) immersing you in the
virtual environment (VR), 2) adds to, or augments, the user’s
surroundings (AR), or 3) both of those (MR).
All written included in this section of the blog are all from
Medium.

Augmented Reality (AR)
- a live, direct or indirect view of a physical, real-world environment whose elements are augmented (or supplemented) by computer-generated sensory input such as sound, video, graphics or GPS data.
- utilizes your existing reality and adds to it utilizing a device of some sort
- Examples: Pokemon Go, Snapchat’s new AR bitmojis.
Mixed Reality (MR)
- merging of real and virtual worlds to produce new environments and visualizations where physical and digital objects co-exist and interact in real time
- placing new imagery or synthetic content within a real space in such a way that they can interact, to an extent, with what is real in the physical world
Virtual Reality (VR)
- computer technologies using reality headsets to generate the realistic sounds, images and other sensations that replicate a real environment or create an entirely virtual imaginary world (a computer-simulated reality)
- true VR environment will engage all five senses (taste, sight, smell, touch, sound), but it is important to say that this is not always possible

Slides from Mr Razif:
For our practical session, we were required to come up with a AR
prototype by imagining ascenario in of a real world situation. What
would the AR experience be and what extended visualization can be
useful? What do you want the user to feel?

Fig 1.7 Steps on creating an application
I came up with a prototype that helps users visualize the food serving
size before ordering. More often than not, advertisements or menus
display food in such an exaggerated and delusory way, not an accurate
representation of the actual food size.

Fig 1.8 AR Prototype by me

Fig 1.9 AR Prototypes by my peers
Week 5
We attended a talk by Mr Adrian Yap today. He works in LottieFiles
and is one of the co-founders. Below are some of the screenshots
from the talk.

Fig 2.1 UX Talk Series: Adrian Yap

Fig 2.2

Fig 2.3

Fig 2.4

Fig 2.5

Fig 2.6
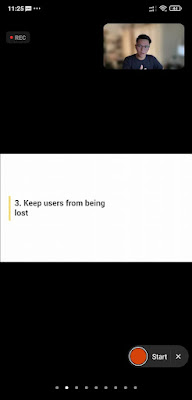
Fig 2.7

Fig 2.8
From Fig 2.2 to Fig 2.7, Mr Adrian talked about a few pointers to
keep in mind when designing user interfaces. Firstly, loading
screens shouldn't be still, but rather, have a sequence to keep
the users interested. This leads to the second point, where
animation can be used during and after the loading period.
Animation could bring the user's focus and attention. With that
said, Fig 2.8 explains a few pointers we should follow when
applying animation into user interfaces. Do not have a few
animations running at any given moment and keep the animation
meaningful. Animating unnecessarily takes the user's focus
something less important, hence distracting them. Lastly, we
should always keep users from being lost. This can be achieved by
having a back button where the user can go back to their previous
page, a breadcrumbs feature to retrace back their steps, or even
loading screens that have skeletons instead of a anxiety-inducing
loading spinner.
Past senior work for reference:
- https://docs.google.com/document/d/1mQYkRihh1Y9LoK_eoUX-gwq3DQzGYzsxO6zUfI09RnE/edit
- https://docs.google.com/document/d/1rhucHJiW061CoEv3RS0jwCFHxv8VJCfErovraYhRwc4/edit?usp=sharing
PROGRESS WORK
Phase 1: Research and brainstorming
I first came up with 3 design pitches. Mr. Razif briefed us earlier this
week to have designs that are either educational or come up with a proposal
with an analysis of current experience, comparison with similar solutions,
and how it can be better. There should also be sketches to visualize the
experience and a mock design of how the final outcome should be from the
user’s perspective.

|
| Fig 3.1 Brainstorming idea 1: Nutrition Helper |

|
| Fig 3.2 Brainstorming idea 2: Taylor's Lakeside Map |
 |
| Fig 3.3 Brainstorming idea 3: 3D Menu |
Phase 2: Documentation of Proposal
Fig 4.1 Proposal presentation video
Consultation feedback from Mr. Razif on proposal:
- Use cards instead of a worksheet.
- Either have a full equation per card (eg. 1+2) OR have one number/equation per card (1, +, 2).
- Each card should have their unique design for easy AR detection
- Place card with number/equation, and have non-static balls hovering over the card.
- All mistakes and feedback should be added to blog.
Fig 4.2 Proposal: Revision 1
Fig 4.3 Proposal: Revision 2 (Final)
Phase 3: Creating the Image-based targets
When I started bringing my idea in the proposal into Unity, I had to rewatch Mr Razif's tutorial. I quickly came to a stop as I faced a problem. What kind of image should I use? With zero experience in AR-related stuff, I initially thought the Image-based targets should be super simple. After reading the article below, I understood the attributes of an Ideal Image Targe for best detection and tracking.
Understanding the Best Practices for Designing and Developing Image-Based Targets

Fig 5.1 Initial designs to try out for the highest Target Star Rating

Fig 5.2 Results of initial designs to try out for the highest Target Star Rating
Phase 4: Going on Unity using Vuforia engine
I created a sphere that appears when it detects the image target I drew! COOL!

Fig 6.1 Results of initial designs to try out for the highest Target Star Rating
As I followed the tutorial, Mr Razif then introduced us to the free online assets we could use instead of the boring white balls. I love free stuff and I obviously don't want boring white balls so I went on a shopping spree on https://assetstore.unity.com/3d and found Low-Poly Style Nature by Himmelfar.
Looking at the designs, an idea sparked in my head. Why don't I change the orange image targets into a green terrain, so I can have trees growing out of it! It could be an interesting concept and more appealing for audiences, in comparison to white balls lol.

Fig 6.2 Imported the tree assets and tried replacing the balls
When I successfully downloaded Low-Poly Style Nature by Himmelfar, imported them into my assets folder, I tried them out as my new GameObjects and it works! I quickly went on Procreate to draw out the terrains. I tried a few different fonts and ended up with Chalkduster. And just for good measure, I upped the image's feature points by adding some grass patterns for improved tracking and attractiveness. To further ensure optimal detection, I made sure the grass patterns were not repeating.
I uploaded them to the database and they all came back with 5 star ratings!


Fig 6.3, 6.4, 6.5 Image target cards

Fig 6.6 5 star ratings for all 3 image targets

Fig 6.7 Successful pop-up of Game Objects at Image target
With that done, it's time to create UI features, starting with buttons.
 |
| Fig 6.7 UI buttons on canvas |
To get buttons to actually work though, was the first big problem I faced. The goal was to have a button that shows the 'trees' when the button is clicked. Another click will make the 'trees' hudden. At first, I asked my peer for help and her method included a lot of coding. But it worked! Kinda.
The problem with this method was the instability of the objects on the image target. At this point, I was too stressed out to take screenshots, but the trees (GameObjects) were flying all over my room and not staying on the image target.
I discovered that setting both the rotation/position values to 0 (for x, y, and z) for the AR camera and the canvas was helpful...to some extent. They became more stable but would still fly around sometimes.

Fig 6.8 Script for linking the buttons to the appearance of 'trees'
Due to the unreliability of this method, I tried another method suggested by my other coursemate. Big thanks to the guy! This method was easier and more stable. The 'trees' GameObjects are now a child of their own image targets, so they stay steady in place. This method utilizes the 'on click' section on the inspector tab. By checking the boxes for each GameObject.Set.Active either true or false, I was able to achieve what the buttons were set out to serve. This can be demonstrated in Figure 7.1, 7.2, 7.3 and 7.4. The video is a bit befuddling though.

Fig 7.1 'Hide' button and 'Show' button on canvas

Fig 7.2 On Click() settings for 'Hide' button

Fig 7.3 On Click() settings for 'Show' button
Fig 7.4 Video showing the buttons work!
With this objective reached, we now move on to the Quiz part. I found a tutorial on youtube that was very useful, and served exactly what I wanted to achieve: Unity Math Game Tutorial by Sandbox Games.
Another bad habit I have is not taking screenshots and putting it in my blog when I face problems. With that said, one of the problems I faced was the unmatching 'names' to the object. According to the tutorial, the texts were labeled as .text but for mine, i eventually found out that I had to use .TextMeshProUGUI instead, thanks again, to my coursemate who might as well start paying for the guidance he has been giving me.

Fig 7.5 TextMeshProUGUI
Something is wrong in the coding because sometimes the equation would work, but sometimes nothing appears on the left box. In Fig 7.6, the equation works properly but the equation in Fig 7.7 doesn't... I am unsure what mistake is made! (XX is the placeholder character I put in the box).


Fig 7.8 Function not found

Fig 7.9 script
Phase 5: Consultation
I found this Fantasy Forest Set by Inigmas Studios!

Fig 8.1 changed game objects to flowers instead of trees
Phase 6: Final product
Fig 9.1 Final presentation of AR prototype
REFLECTION
No doubt this module was one of the fun ones. To be frank, I started working on Unity rather late towards the end of the semester due to the tremendous workload of other classes. I got a late start on this project, but I still had a great time working on it. I wish I could go back in time and give myself more time for this project so that I could have made an augmented reality app that was both enjoyable and easy to use. One of the issues I experienced was the coding. I intend to improve my coding skills throughout the following semester break by taking additional classes and practicing with real-world projects. Some self-notes to take into the next semester:
- start working on assignments wayyy earlier in the semester
- stop telling myself I can do it over the weekend. start right after the class is finished. no, infact start DURING the class. more often than not, the lecturer allocates time for us to work on the assignment.
- blog everything!
Comments
Post a Comment